
Okay! You've got a big bowl of chilled dough, templates, parchment, a Silpat, cookie sheets, an icing syringe, the ingredients for the glue, a mess of candy, and the patience of a saint? Good. If not, re-read the previous post. I'll be here when you're ready.
Preheat the oven to 375°F.
Lay out your Silpat, and lay a sheet of parchment on top. Using a rolling pin with a nicely floured sleeve, roll out a blob of dough on the parchment until it's big enough for your first house piece and about 3/16" thick. Using a pizza wheel, or a gently wielded table knife, cut out your piece. With the knife, nudge the scrap dough away from the house piece.
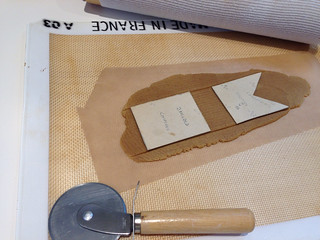
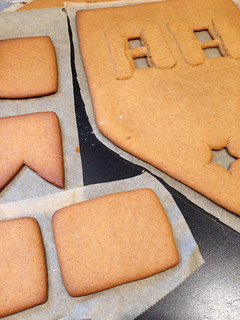
Trim the parchment if you'd like, and transfer the dough - ON THE PARCHMENT - to your cookie sheet. Repeat until you have all of the pieces made - and don't forget to make two roof panels, two pieces for the front/back, and two gable end pieces. [Note - you're actually not using the Silpat for cooking. I find that it has a nice stickiness about it that serves to hold the parchment in place on the counter while I'm rolling out the dough. I used to try to glue the parchment to the counter with dabs of shortening, but the Silpat works much better.] If you don't have enough cookie sheets, colonize all the flat surfaces in your house with dough-covered parchment, until the cookies sheets are free again.
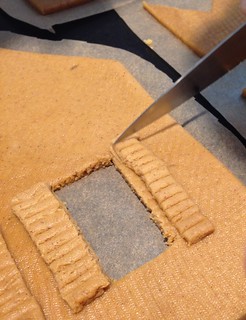
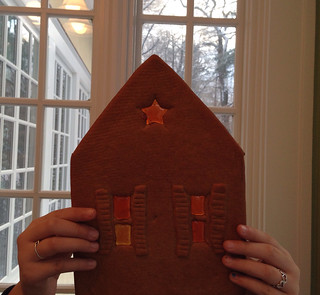
You want doors and windows, right? Before baking, cut out window openings, and a door. You can use some of the scrap to make shutters, you can roll scrap into little balls for decoration, you can gently score the chimney sides to make the dough look like bricks. If you're crazy, you can even make window muntins out of thinly rolled bits of dough. You might want to keep the piece you cut out for the door, so that you can later glue it in place propped open. [I used the wrong sized platform this year, and so there was no room for the door. It got eaten by someone.]
Bake the pieces in the 375°F oven for about 10 minutes. You want the pieces to be well-baked, and nicely dry, but not burnt. Cool on the pans. The pieces are big enough that you don't want to risk having them sink - even a little - into the spaces on a baking rack.
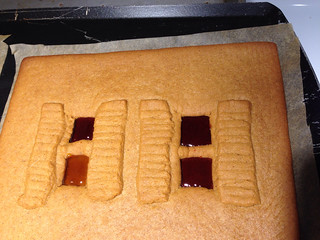
Stained glass windows are a delightful thing to include in your house, but making them isn't for the faint of heart. I always used to do it by smashing up the sour balls and carefully filling up the window openings BEFORE baking. It was always kind of messy looking though, and when I did it this year, the candy didn't melt properly. So we cut that window out, and hit the google looking for a solution. Ta da! The microwave! Thanks to Heart of Light, we used the microwave to melt the crushed candy in custard cups - which we then spooned into the window openings. Again, stained glass windows are not for sissies - and not for children. Melted sugar is dangerously hot, so be careful.
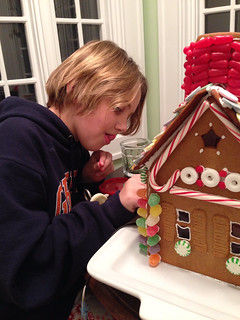
Once all of your baking is done, and your stained glass windows are fabricated, make the royal icing, and find a big board or huge platter to build on. This would be a good time to enlist a helper monkey, like your ten year old.
Also, if you're planning on putting a light inside that requires a cord to exit the house discreetly at the back, you'll want to position the light and make a little cut-out for the cord. This is completely optional, by the way.
Load up your icing syringe and pop on a small plain round tip. [Or use a piping bag or a ziploc - I prefer the syringe.] Peel the parchment off of the back of one of the four sides of the house and run a bead of icing along the bottom. Position it on your board, and get your helper monkey to hold it in place. Find the adjacent piece, run a bead of icing along the bottom and the side that will be adjacent to the first piece. Maneuver it into position, and help your helper monkey hold it in place. Continue around until your four walls are up. If your husband is a wood-working model-builder, he may try and "clamp" the house together with string.
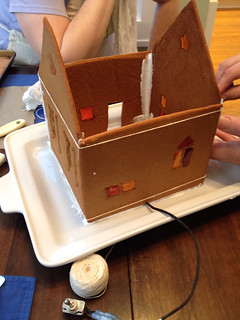
Use the icing like caulk and make sure all the gaps between the walls are sealed. Not only does it help with the aesthetics, the icing is structural - it dries like concrete and will help hold your house together.
I cheat at the roof. Using dental floss and a blunt needle, "sew" the roof together with two loops, hinges, if you will. Run a bead of icing along the tops of all of the walls and gently place the roof. Take a deep breath, and pause for a cup of tea. Once the icing is good and dry, add your chimney (if you made one).
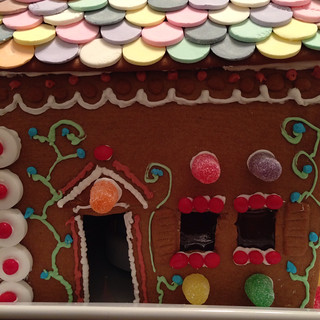
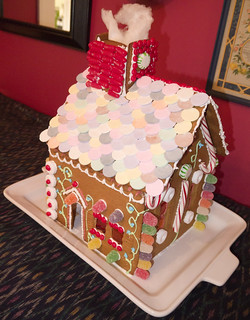
Meanwhile, have your helper monkey start unwrapping the candy. I always start with the roof. We used to do it with rows and rows and rows of mini-marshmallows, but Necco wafers are really the best roof tile ever. Work two-handed, and squirt a blob of icing on each wafer as it goes on the roof. Work from the bottom up, just like a real roof.
Once the roof is done, get to work on the rest of the house. I like doing rows of spice drops like quoins, and candy canes can be broken into lintels. I also have OCD control issues, but I did hand the syringe over to the helper monkey. In fact, she did the whole Mike and Ike application for the chimney bricks.
You can also tint some of your icing. This is nice if you want to make vines, and morning glories, and Painted Lady Victorian doodads around doors and windows.
If you happen to have access to cotton candy of some sort, it makes nice smoke coming out of the chimney. However, it has to be replaced periodically, because it tends to absorb moisture out of the air and collapse into itself.
When you're all done, have a party, because you're totally going to want to show off your house. And when the kids go back to school in January, the whole thing is edible, so break it up and pack it off in their lunch boxes.
Enjoy!


5 comments:
That is so incredibly pretty! I want to make one and then invite the kids over to pick it apart.
So pretty! I haven't made one in years...
I love that you're so hardcore about this--and that the instructions require stopping for a cup of tea.
So beautiful.
Gorgeous!
Post a Comment